Spent the last 2 days making splits. This is taking frames of eggs, larva, and worker bees from one hive and placing them in a new hive with honey and pollen. The concept is that the now queenless hive will build queen cells and raise a new queen. If one is fast enough, you can harvest a few queen cells for other hives, but I’m just looking for one queen per split at this time. The previous post went into detail about the how’s, when’s and especially, if’s, about having the ladies create their own queens.
It is not what I or the bees would call warm here. I’m outside writing, but wearing 3 layers. So my splits sit atop other hives. (At the end of this post I’ll put in a bit about how to do overnight splits for anyone who hasn’t done this.)
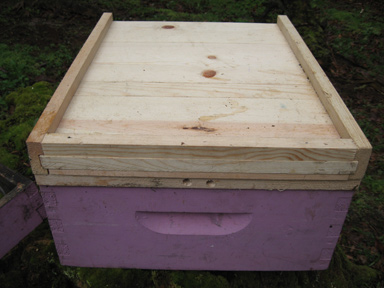
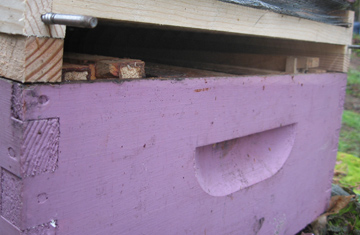
Last year my hardworking, furniture making husband got roped into making me some formal “platform for splits – when I still want to feed the lower hive” just lilts off the tongue doesn’t it? It’s an elaborate “bottom board” with a removable piece.
This enables me to place a split on top of another hive, but still have a way to put pollen substitute or syrup or candy boards in for the lower hive. Which of those I use, if any, depends on the time of year and plant conditions.
The bottom of the platform extends up from the parent hive about 3/4″. This allows space where items can be placed and for an upper entrance for the lower hive.
Above this platform a one-inch riser goes 3/4 way around the platform.
The platform sits on the established hive. Then a bottom screen sits on top of the board. Then the split sits on top of the bottom screen.
This allows the split, aka a nuc (nucleus hive), to benefit from the heat of the established hive. A necessity in our cool spring weather here in northwest Washington.
When I use a full hive body for the split the entrance is dramatically reduced to less than 1/2 inch using 1/8-inch hardware cloth jammed in each side, leaving an opening in the center. When I use a nuc-box the openings are either cork-sized holes with 1/2-inch hardware cloth in an “x” over them, or two 5/16 holes.
The small entrances are to slow down robbing bees from other hives and the on-going onslaughts by our prolific mice. The entrances face in the opposite direction of the established hive’s (ie north, if the established side is south) or they open on the side of the nec (nucleus hive)
This works well, but I do this after I put a split on the hive. So there are already four boxes on the established hive (I use westerns for everything) when I add the box with the split. I’m not all that tall.
There is nothing like hoisting a somewhat heavy box of truly angry, stinging insects up to your face-level then gently placing it on top of a tower of boxes. It’s one of the joys of beekeeping. If all goes well and they produce a queen to make a viable hive, it’s all worthwhile.
Read on for how I do overnight splits.
I am hopeless at finding the queen by looking at frames. I have a different method, which I don’t use on overnight splits. That is the beauty of these splits: you don’t have to find the queen or worry that she’s in the split. But it does take 2 days.
Overnight splits, “how to”:
You’ll need: 1) A box of honey, pollen, drawn frames, and foundation. 2) A queen excluder.
Go to the “parent” hive – the very busy, packed hive where you will find the makings for the split. Take the 2 frames out of the hive box you brought along, leaving an opening for 2 frames in the center of your new box (make 4 spaces if you’re taking honey and pollen frames from the parent).
Open the parent hive and find at least one frame of eggs and larva. 2 is better. Some people use even more. You need to leave eggs and larva in the the parent hive: push these to the center locations, and remember to add drawn comb or foundation 1 or 2 places in from each outer wall.
Set the new box on top of the up-turned hive top at an angle, so there is space under the box.
As you remove each frame of eggs/larvae – shake or brush all the bees off of the frames and back into the Parent hive. Check the now nearly bee-free frame for the queen (she won’t be there, but check) and when you see she’s not there, put the frame in the new box. Do this with the next frames as well – put bee-free frames honey and pollen on each side of your egg/larvae frames.
The bees are going nuts by now, but keep working. Wouldn’t you go nuts if someone did this to your kids?
Put your spare frames into the parent hive so there is a complete number and put the queen excluder on top. Now put the new box on top of the queen excluder. Put the top on. Walk away.
Well, walk to go prepare where this hive will go. Is it warm? Then you can treat it like a new hive, with a very reduced entrance because other bees will rob this weak hive. Is it cool? Then the best place for this delicate new hive is on top of another hive. It can be on top of the parent hive. Which all takes you back to the top of this post.


