
I keep mentioning that I’m “making equipment like crazy” this year, due to good weather and bee hive expansion. One of the things that we make here at Brookfield Farm are our own bottom screens. I don’t use bottom boards – just screens. This is a pictorial blog: I took a bunch of photos of the process, and here they are:
The ever so tidy work area for building beehive bottom screens:

The Exterior Work Area
The wood is cut up by my husband whose normal occupation is making handcrafted furniture.

Ian volunteers to cut wood
The beehive bottom screen base:
The base of the bottom screen is two inches tall. Years back I read that if a mite falls 2 inches or more it has a hard time crawling back up into the hive. Will it fall between 1/8″ wire? I doubt it, but I still do a two-inch base.
First the wood is clamped

Clamped before Nailing
Then nailed – yes, nailed.

Nails! Yes, very retro
Wire for Beehive Bottom Screens
Then the wire is prepared. I use 1/8″ hardware cloth. It’s too small for bees and wasps to pass through, big enough for a mite and a lot of bee debris to fall though.

1/8″ inch hardware cloth

On the Cutting Board with tools
You can see why I do this outside – it takes a lot of space
The long ruler is to mark the cut lines
The right angle is to keep those line straight
That wire snip was an anniversary gift from me to my husband – romantic, eh?
After a lot of cutting, I’m ready to attach the wire to the base.

Stacked Cut Bottoms
Attaching Wire to the Base of the Beehive Bottom Board
I staple it on with a stapler used for putting tar paper or tyvek onto the sides of houses.

Stapling the Wire

Stapled corners of bottom screen base
The staples don’t always go in all the way – that’s why there’s a hammer standing by as well.
Creating the top portion of the beehive bottom screen
At this point I’ve got a 2-inch tall rectangle with screen on it. Now the top of the bottom screen needs to go on. It’s a one-inch by one-inch wooden rim that goes 3/4 of the way around the bottom screen, leaving a gap at the entrance.

1″ X 1″ wood – bottom screen top edge
Once that’s on, I cut and put on the front “stoop”. Metal dry wall corner molds (I think, at least I get them in the dry wall section of the store), which are cut to the width of the front entrance.

The front door
These too are nailed in place.

Metal front in place
Finally it’s done – no, not really….
A nearly finished Beehive bottom screen
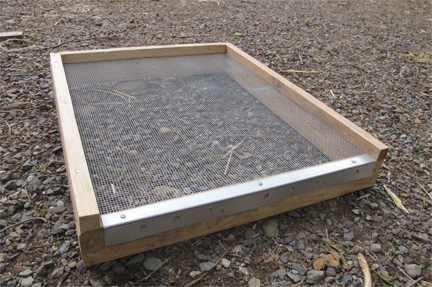
Almost Done!
Two uses in one for the beehive bottom screen
When the screen is flipped over, it becomes the base I use when moving single boxes of bees. The one inch side, in this case pointing down, allows for air circulation. The two-inch side, now pointing up, keeps the bees from leaving.

Flipped screen: beehive tranport base
The final work on the beehive bottom screens
I make a number of these at a time. They often, like this year, get placed into service before they are really done.

Stacked Screens and Tops
As you can see from the above caption, we also make our own beehive tops. Back to screens: what these lack are the “hanger bolts” – these have screw ends on one side and threaded ends on the other.
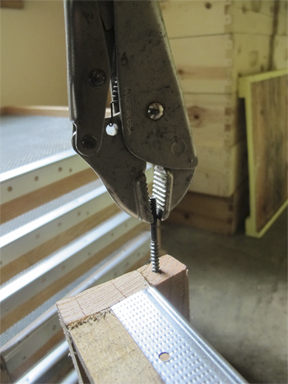
Hanger Bolt being screwed in place
These will hold the mouse guards in place (I’ve still got to make more of those)
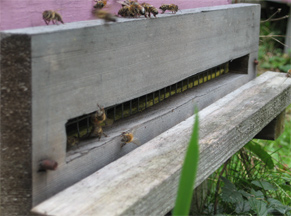
Mouse Guard on Hive
Then the outside and bottom of the screen is either painted or stained. I’m trying out an Eco Wood Stain that this year. Supposedly friendly to all creatures and the environment while protecting wood from wet weather. Will it hold up here? Who knows. But worth a try.
That’s some of what’s going on at Brookfield Farm Bees And Honey right now. I’ve just finished doing my last group of splits for the year to accommodate queens arriving soon from Northwest Queens. That meant clearing areas for the new hives and making sure I had all the gear they would need. In the course I slated a few hives for walk-away splits that have grown way too tall. The queenless ones of those will be given some of the new queens.
How is the bee season progressing in your part of the world. We continue to be unusually dry and warm. Nice, but worrisome – we do need the rain.