

Queen Cell Success
You get the “WE DID IT!” image first, because I’m so happy that our first attempt at grafting honeybee queen cells went well: 25% to 50% of the grafts on each frame became queen cells. We’ll get better, but I’m very pleased.
Now THE STORY:

A Group Graft
Four of the “Bruce Bowen Irregulars” gathered at the bee yard where we had created queen cell builders the other day and tried our hand at grafting. Two of us had grafted in the somewhat distant past (Pat and Marco), one of us had tried this, unsuccessfully 2 years ago (me), and one of us had never attempted this before (Sky).
It went quite well. Sky and Marco shared a frame, and then Marco turned his over to her. Pat and I each did one frame.
THE SET UP:
Our set up was outside of a little three-sided building, but, amazingly, the weather was good and we opted to work on tables set up outside. It is best to point out that “good” weather this year means it was somewhat warm and just about to rain, but not raining. The larvae would stay moist throughout our endeavor.
THE TOOLS:

Cups on Bars in Frame
The grafting frame: Each frame holds three rows of plastic cups. Each row is an adapted grooved bottom frame into which the cups clip. The information from the breeder queen was written on the top of each frame.
Grafting tools: We wound up using the inexpensive Chinese grafting tools that are readily available on-line. I did try a 00 sable paintbrush (very popular in France, it seems), but I could not roll the larvae off of the tip. The Chinese grafting tool has a plunger which pushes a bamboo (?) slide down the grafting tip. This allows you to slide the larva off easily.
Warm, damp towels: The larvae need to stay warm and moist, but not wet. We had hand towels and a large thermos of hot water – the water cooled quite rapidly once it was on the towels.
Visual aids:

Optivisor on Beekeeper Bean
I used an optivisor. A magnifier you wear on your head. I found the #3 magnification worked well for me. We also had a magnifying glass that clamped to a table, and a hand held magnifying glass. The clamping magnifier did not get a lot of use. What worked for me is the optivisor – couldn’t graft without it – it’s a vision thing. Pat liked his hand held magnifier. Sky and Marco didn’t use one at all.
WHAT WE DID:
- We laid our frame bars with the inserted cups on the table.
- Using the warm, moist towels, we covered all but one cell cup on each frame.
-
Scooping Up a Larva
Each of us had a frame of brood laid by three excellent breeder queens. We looked through the assorted ages on our frame and tried to choose age appropriate larva.
- We wanted tiny larvae that were almost straight, which would mean they just hatched. If we did not find that we went for tiny larvae that were just slightly curved (a crescent moon, as Marco would say). If the larvae had curved into a “U” they were too old.
- With varying degrees of ease, we then:

Sky Selects A Larva
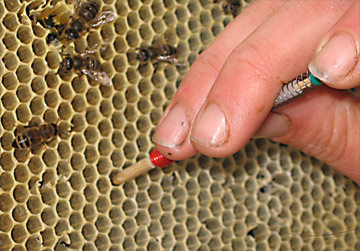
1) Slipped the tip of the grafting tool under a larva and the royal jelly in which it lay.
2) Moved that larva to the cup not covered by the towel
3) Placed the larva in the center of the cup making sure not to flip it. A flipped larva is a dead larva as its spiracles (its breathing holes) are on the side facing up.

Placing Larva in Queen Cup
4) Covered that cell with the warm towel, exposed the next, empty, grafting cell.
5) Repeated the process until each bar of 15 cups were filled.
- As each bar was completed, it was covered by the warm, moist towel.
- When all three bars were filled they were placed into the cell builder
CLOAKE BOARD NOTES
We are using Sue Cobey’s cloake board queen rearing method which needs a few pages in itself . The above link takes you to a great page and images from the Leeds Beekeepers Association in the U.K.
This is what we did:
1) On grafting day:
-

Cloak Board Slide In Place
We inserted the slide, which isolated the top box from the bottom, queen right boxes. We did leave a little gap at the back, as Sue Colby suggested.
- We replaced any open brood in the upper box (above the cloak board) with sealed brood.
2) 24 hours later:
- We removed that slide, allowing an easier flow of nurse bees into the top box, above the queen excluder portion of the cloke board
3) 5 days after the graft:
-

Pat Ray & his Queen Cells
Pat and I moved the queen cells created by the group’s grafts to incubator hives where they will continue to mature.
- The incubator hives are a box of nurse bees placed over a queen excluder with a queen-right hive below.
THINGS DID NOT QUITE GO ACCORDING TO PLAN:
If this sounds like we just slid though perfectly, let me correct you. We had a schedule for our first grafting attempt, but the bees had other ideas.
We had placed beautiful frames of drawn foundation were placed into the hives of 4 excellent breeder queens. The hives were packed with open larvae and sealed brood. Surely the queen would say “whoopee” a place to lay and go to it. Well, as we know, the workers really rule the hive and apparently they figured that they had enough sisters for the moment. What they wanted was a place to put the nectar they were bringing in. Sure enough, all four of those frames were filled with honey. So much for our first schedule.
We examined the hives and there were no acceptable age larvae to graft. A daily check finally turned up 3 frames from which we could graft. Thus, we grafted 4 days after our “scheduled” grafting day. The best laid plans of mice and men and women will always fall second to those of the honeybees – which is, of course, how it should be.

Pat Ray & Dalilah
That’s the news from Brookfield Farm Bees and Honey, in Maple Falls, Washington, and from Bruce Bowen’s Bees, in Mount Vernon, WA. Bruce is committed to getting his “irregulars” up to snuff on raising queens. Our intentions are to keep grafting once a week until the end of August, because any queen cell raised after that would not be able to mate in our beautiful, but damp and cold environment here in Washington’s Pacific Northwest.
This is Pat and his dog Dalilah – she didn’t make the group graft image as she was helping Pat take photos, but she is a constant source of sweetness at the bee yards.
Pingback: Finally some sunshine | Adventuresinbeeland's Blog